Step 3: QuickBooks Online Integration Settings
Integration Settings Walkthrough and Explanations
The following steps will take you through configuring the most important settings for the Zoey x QuickBooks integration.
1. Customer Settings
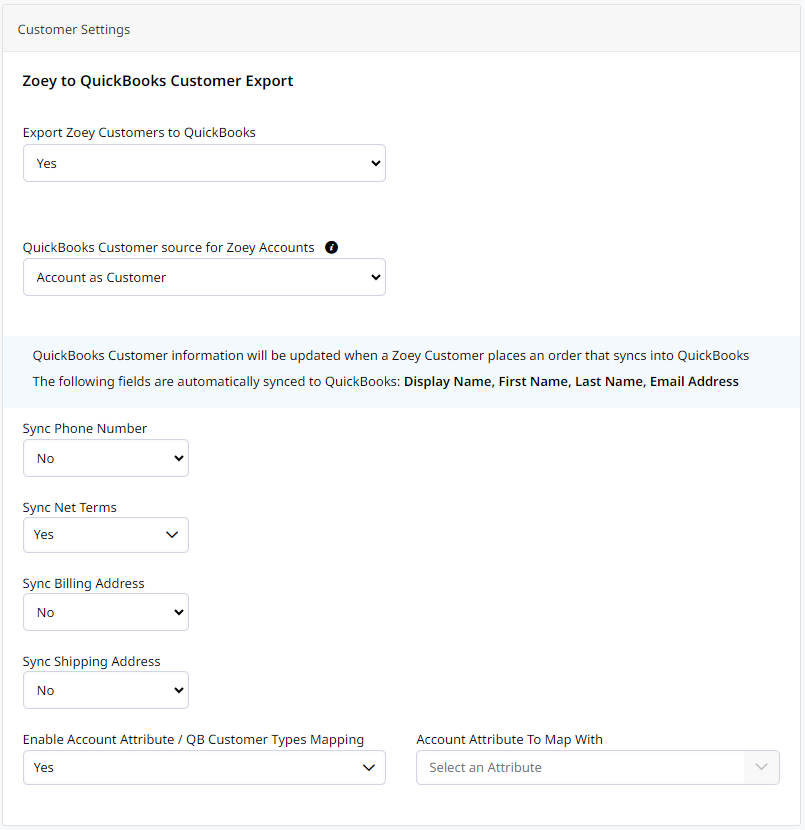
Determine how Zoey should sync Accounts information to QuickBooks Online. You'll need to choose the option that best fits how you manage your QuickBooks environment.
Here are some options:
- You can disable syncing Account data by setting Export Zoey Customers to QuickBooks. to No.
- You can sync your Account data to Customers in QuickBooks.
- Account Locations can be mapped as Sub-Customers in QuickBooks.
- An Account can be mapped as Sub-Customer of specified Customer.
- A Contact can be mapped to a specific Customer or Sub-Customer.
If you are exporting your Zoey Accounts to QuickBooks, you can decide whether to sync their phone number, Net Terms details, Billing/Shipping addresses, and custom Account Attributes.
When Export Zoey Customers to QuickBooks is set to No, it will still attempt to create a QuickBooks customer if one does not exist, when syncing the Invoice. When set to Yes, it allows you to manually sync Zoey contact data into QuickBooks from the contacts grid, and will send updates to QuickBooks beyond the first sync, when it creates the Customer.
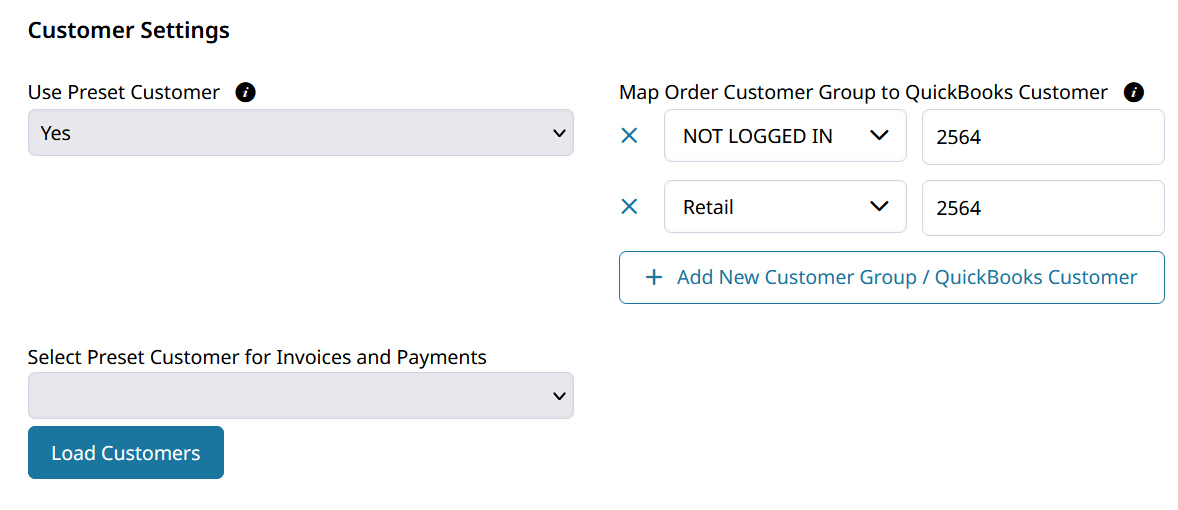
Sync to Preset QuickBooks Online Customer for all Orders
You can choose to sync all orders to one Customer based on the Customer Group by supplying the QuickBooks Customer ID.
Another Preset Customer can then also be used for tracking Invoices and Payments.
Customer Lookup Fields
Customers are looked up by their Account or Contact Name against the QuickBooks Display Name.
Generated Display Name will comprise offirstName-lastName (email).Customers will be synced this way if not found initially by Name.
Display Name Fallback will be tried if the Customer cannot be found initially. Each field included in the fallback option will be searched in against the Display Names to locate the Customer.

Manually Linking Zoey Account to QuickBooks Customer ID
In the QuickBooks tab of the Account you will find a text box to enter the QuickBooks Customer ID into. This will be the new Customer that this Account will sync details to.
Details will be updated in QuickBooks Online when the next Order is placed by this Account.

2. Product Settings
The Zoey x QuickBooks integration can manage your product inventory and pricing in Zoey, as well as keeping your QuickBooks products updated. You'll need to decide how products are synced between the systems.
Lookup Settings
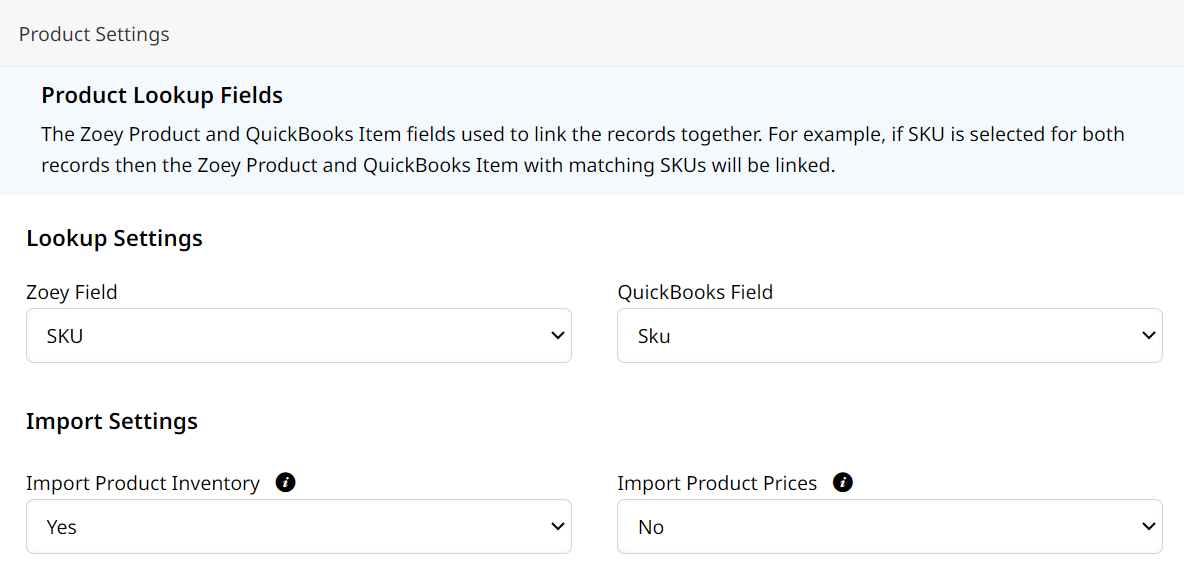
Here are the steps for setting up QuickBooks Online Product Import updates:
- Set which fields will be used to lookup products in each system.
- Decide whether Zoey Inventory should match Qty on Hand in QuickBooks. This setting will update the Product Quantity from QuickBooks twice an hour.
- Choose whether to match prices in Zoey to the sale price of the item in QuickBooks. This setting will update the base price of Zoey products with the Sales price/rate for its associated QuickBooks item twice an hour.
Import Settings
Import Product Inventory From QuickBooks Online
When Import Product Inventory is set to Yes, every 15 minutes the stock quantity in Zoey will be updated with the quantity of matched Inventory Items in QuickBooks.
Skip Inventory Import from QuickBooks for Specific Products
- Prevent Inventory Sync Attribute enables you to prevent some products from having their inventory updated by the QuickBooks Inventory Sync.
Create a Yes/No attribute and set it to Yes on all products that should not have inventory updated by QuickBooks Online.
Import Product Prices from QuickBooks Online
When set to Yes, Zoey product price will be set to the Sales price/rate for its associated QuickBooks item twice an hour.
Import Product Cost from QuickBooks Online
When set to Yes, Zoey product Cost will be set to the Cost for its associated QuickBooks item twice an hour.

Export Settings
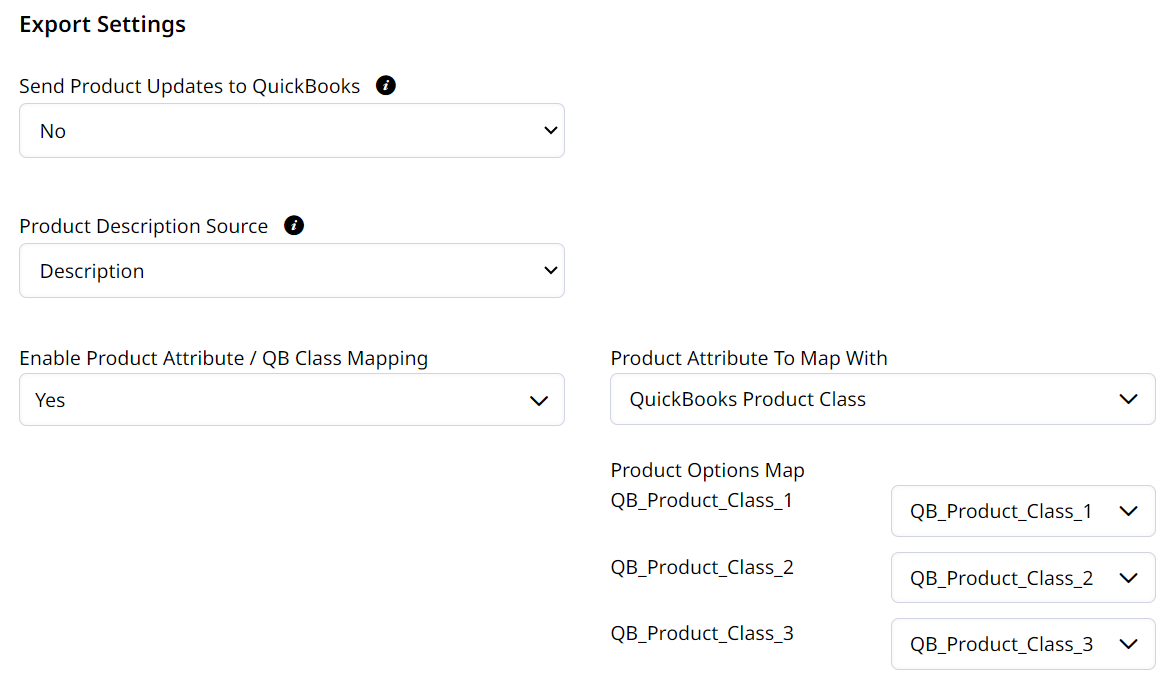
There are also export settings for pushing product information to QuickBooks:
- Decide whether product updates are sent to QuickBooks at all.
When set to Yes, product updates will be sent to QuickBooks, including Price, Cost and Qty from Zoey. This will override Qty and Cost in QuickBooks.
When set to No, the Product Data is only sent to QuickBooks if the Product does not already exist in QuickBooks. You can also manually sync new products using Products > Bulk Actions > Sync Data to QuickBooks.
- Select the Product Description Source for the description update.
- You can also select custom product attributes to map to QuickBooks.
3. Order Settings
The Zoey QuickBooks Integration can be set to be a bi-directional sync.
- You can enable Zoey to create invoices in QuickBooks.
- When collecting online payments, like Credit Cards or ACH in Zoey, Zoey payments can create the payments in QuickBooks.
- When entering offline payments, like checks or wire transfers, QuickBooks can create the Payments in Zoey.
After setting Create QuickBooks Invoices to Yes, more specific settings appear.
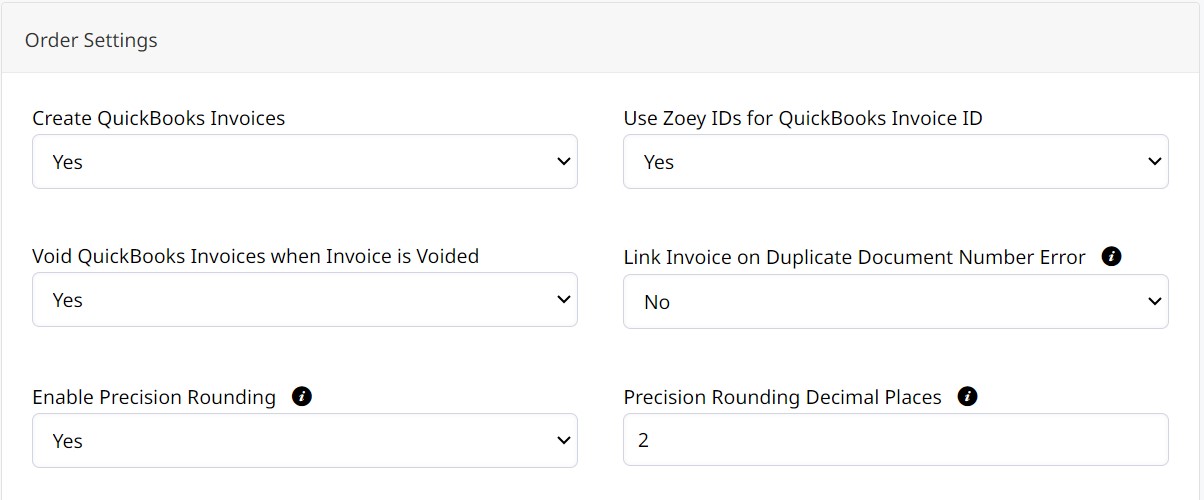
Create QuickBooks Invoices From Zoey Invoices - When set to Yes, QuickBooks Invoices will be created from Zoey Invoices instead of the Order for Orders placed using the specified Payment Methods.
Use Zoey IDs for QuickBooks Invoice ID - When set to Yes, the Zoey Invoice number will be used as the QuickBooks invoice number.
Void QuickBooks Invoices when Invoice is Voided - When an Invoice is voided, it will also void the Invoice in QuickBooks.
Link Invoice on Duplicate Document Number Error - Document numbers need to be unique in QuickBooks. If an existing document is found when trying to create a new invoice you will be thrown a Duplicate Document Number Error. When set to Yes, an Invoice that cannot create a QuickBooks Invoice, because the invoice number already exists on a QuickBooks Invoice, will be linked to the Invoice with that Invoice Number.
Enable Precision Rounding - This setting should only be needed if your Zoey and QuickBooks environments use different decimal precision, such as Zoey using 3 decimals points for USD when QuickBooks expects 2. When set to Yes, Zoey will force totals to be rounded to the specified decimal point. This setting may help resolve rounding issues between Zoey and QuickBooks.
Payment Settings
Mark Invoices Paid when QuickBooks Invoices are Paid When set to Yes, a payment received in QuickBooks will create a Payment in Zoey. Only Invoices sent to QuickBooks can be Marked Paid.
Zoey will check QuickBooks every 15 minutes for Paid Invoices.Click the Sync Paid Invoices to manually sync Paid Invoices.
Receive Payment for QuickBooks Invoice when Invoice is Paid - When set to Yes, a Payment in Zoey will create a Payment in QuickBooks.
Receive Payment only for specific Zoey Payment Methods - When set to Yes, select from the payment method list which Payment Methods to receive payments for in QuickBooks.
Refund Settings
Auto Create Refund Receipts - When set to Yes, a QuickBooks Refund Receipt will be created for a Zoey Refund when it is created.
Refund Receipt Line Item Name - Enter the Name of a QuickBooks Product that will be used to represent the amount rended for each Zoey Invoice. It is recommended that this Product be a QuickBooks Service or Non-inventory Product.
Refund Receipt "Refund From" Account (Account Type | Detail Type) - A Refund From Account must be chosen. Only Account Types Bank and Other Current Asset can be used for Refunds
Shipment Settings
Set Shipping Information on QuickBooks Invoices - When set to Yes, the first shipment's Shipping Info will be included on the Invoice in QuickBooks.
Item Settings
Create Bundle Sub-Items in QuickBooks - When set to Yes, the sub-items within a Bundle will be set on the QuickBooks Invoice. The Parent Bundle must be set up in QuickBooks first.
Use Bundle Sub-Items Price and Qty -
When set to Yes, the Price and QTY for each individual Bundle Sub-Item will be synced to QuickBooks. When set to No, the parent Bundle Price and QTY will be set for each Sub-Item.
Add Line Item Descriptions - When set to Yes, Line Item Descriptions will be set in QuickBooks Invoice, using the Line Item Descriptions Field selected. Select Description to use the Zoey product description, or you may select a different Zoey field to use.
Use Variation Descriptions - When set to Yes, the descriptions of individual Variations, rather than the Configurable product description, will be used on the QuickBooks invoice.
Add Customizations to Line Item Descriptions - When set to Yes, any Customizations set on the line item in Zoey will be added to the Description in QuickBooks.
Additional Invoice Settings
Use Order Billing Address for Invoice - When set to Yes, the Bill To on the Zoey Invoice will be used as the address in QuickBooks.
Assign Class to Invoice and Assign Location to Invoice - These must be set up in and enabled in your QuickBooks environment to map to Zoey fields.
Custom Fields
Only 3 String based custom fields are available to be mapped through the QuickBooks API.The integration will only be able to map data for 3 string custom fields. You will not be able to retrieve or set information for the rest of the custom fields because of limitations in the QuickBooks Online API.
Mapping Order Number to the QuickBooks Invoice
You can map Zoey order data to any field on the QuickBooks Invoice. After setting Map Custom Fields to Yes, a list of QuickBooks Online invoice fields are returned for you to map to. These Custom Fields must exist in QuickBooks to map.
Simply select the data you would like to use for the invoice field. Select Increment ID to map the Zoey Order number to a custom field in QuickBooks.
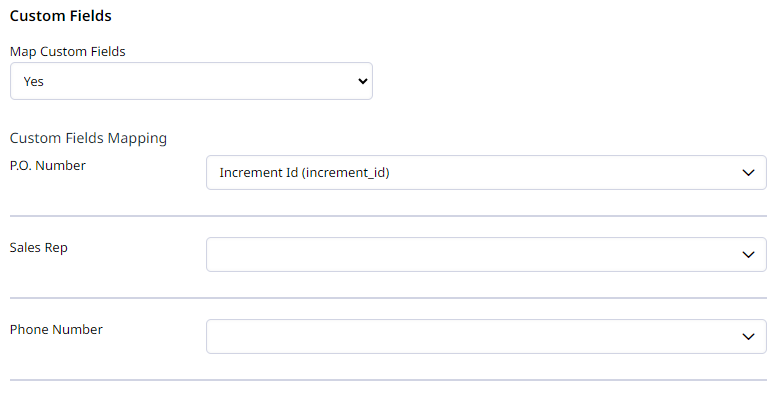
Increment Id (increment_id) is the Order Number.
QuickBooks Line Item Amounts
Map QuickBooks Services as line items to Discounts, Gift Card Discounts, Store Credit, Shipping and Additional/Surcharges). Discounts and Shipping, when set to No, will map to the Totals fields on the Invoice.
Additional Charges, Net Term Discounts and Late Fees should be a Service Item in QuickBooks, when set to Yes.
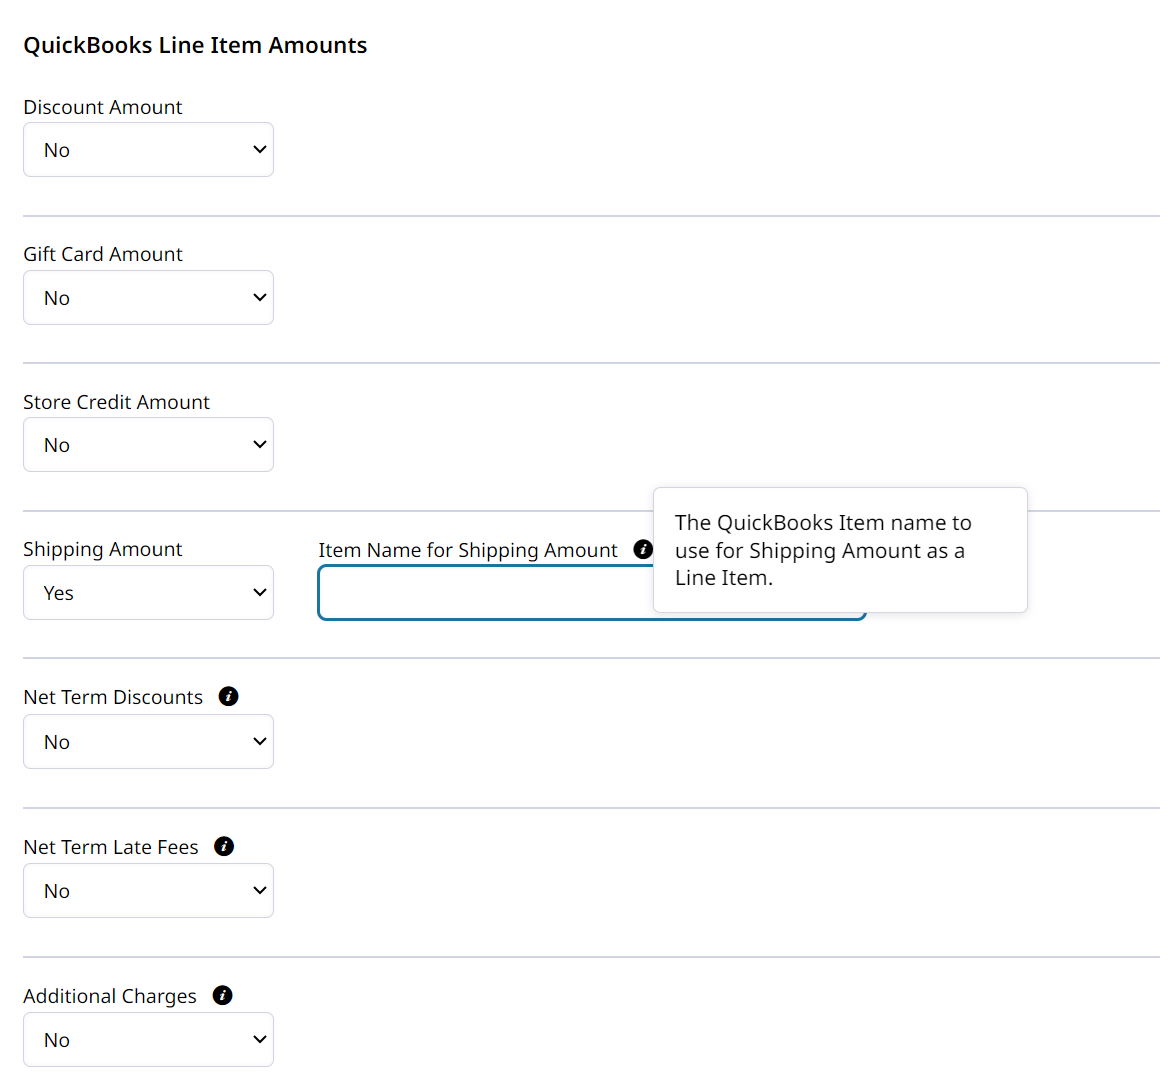
Additional Charges, including Surcharges on Payment Methods. When set to Yes, an additional line item will be added containing additional amounts like a payment surcharge. The item should be a Service Item in QuickBooks.
If you do not map your Discounts, Surcharges, or Fees then they will not be represented on the QuickBooks Online Invoice.

Shipping Charges must be enabled in QuickBooks to sync Shipping Amounts from Zoey.
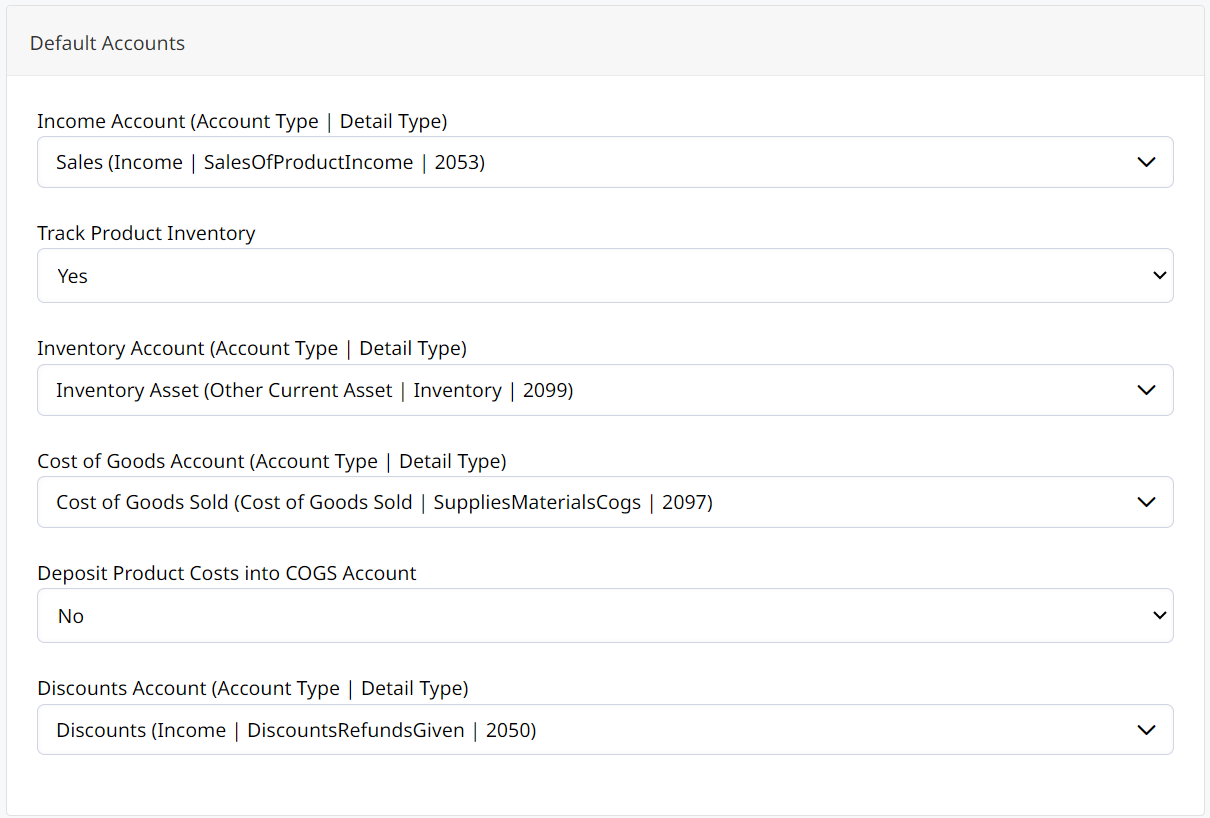
4. Default Accounts
This section will let you select the QuickBooks Accounts for Income, Inventory, Cost of Goods, and Discounts.
Neglecting certain Default Accounts can cause errors when syncing.
5. Payment Methods
When a Payment is made in QuickBooks it must sync to Zoey to mark the Invoice as paid or update the Order. Zoey will record the payment method as based on the mapping configured below.
This section is for assigning Zoey payment methods to QuickBooks Payment Methods and an Account for the funds. The QuickBooks deposit account is important for your business' accounting processes.
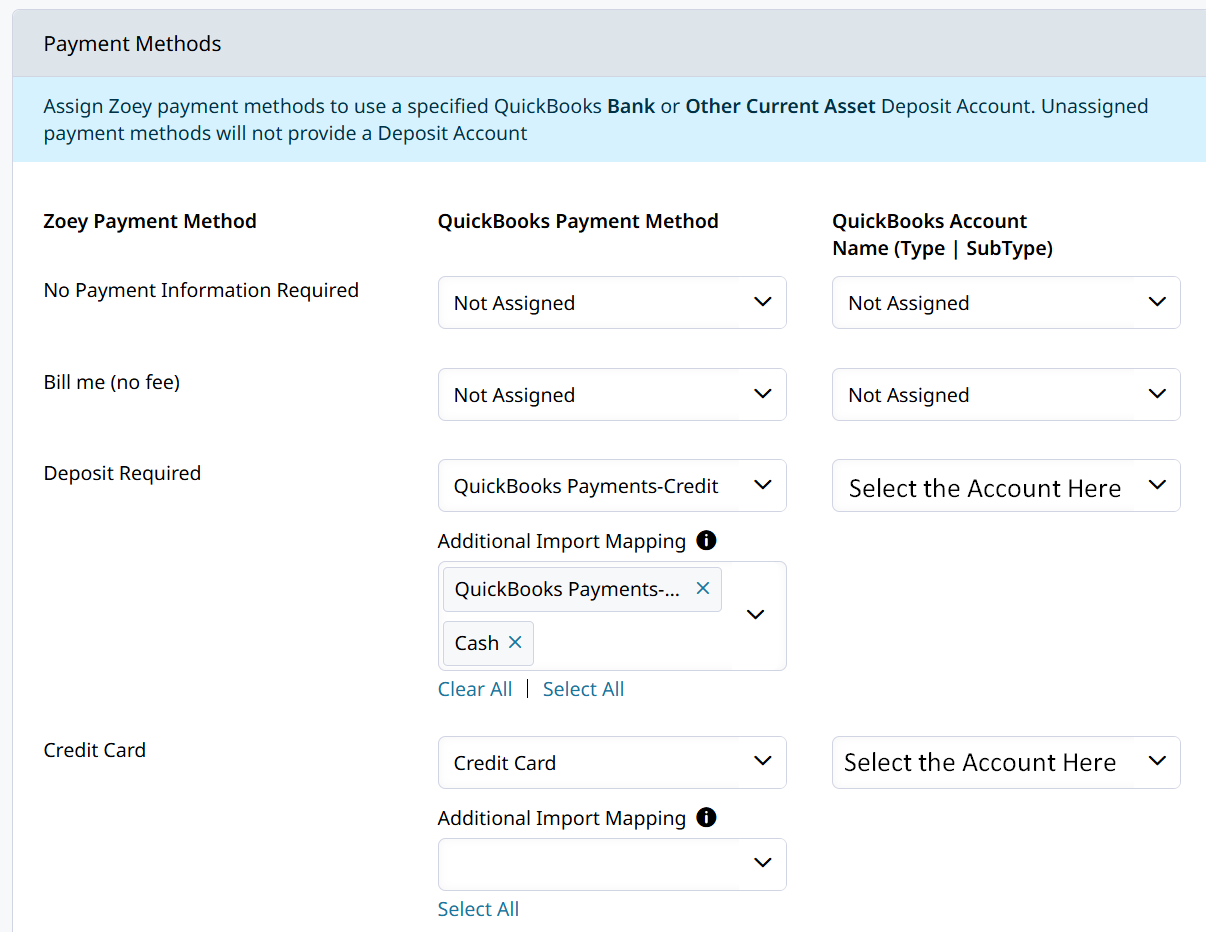
Multiple QuickBooks Payment Methods can be mapped to a single Zoey Payment Method!
List multiple QuickBooks Payment Methods underneath Additional Import Mapping to use a single Zoey Payment Method to represent multiple different types of payments being collected in QuickBooks.
6. Net Terms
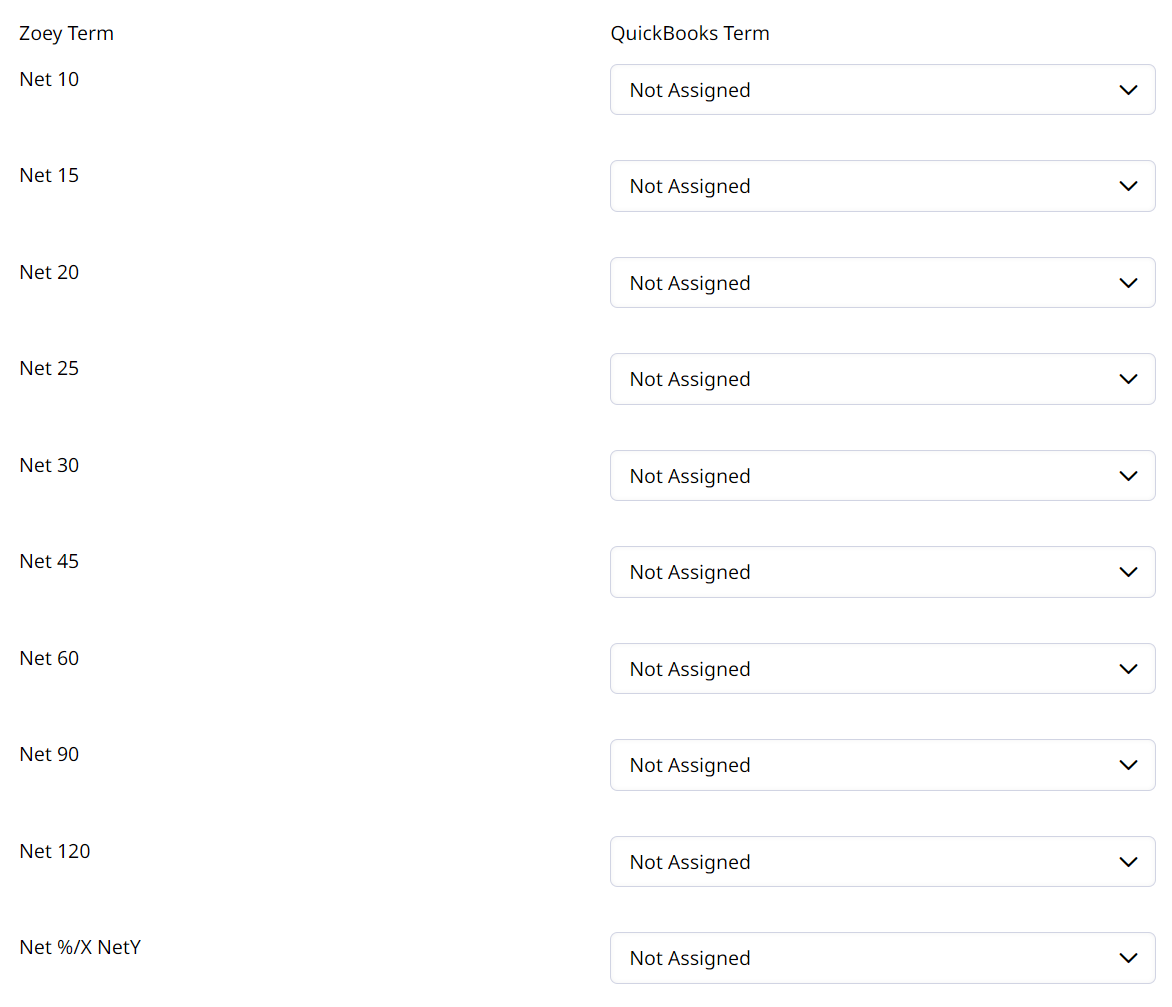
This section allows you to Assign Zoey Net Terms to QuickBooks Terms.
7. Tax Rates
Learn more about configuring Tax Codes and Taxable Status in Zoey here.
This section allows you to configure how taxes sent to QuickBooks Online.
Zoey will send the total tax amount for an order if it contains a tax code, or it can simply send the taxable status of an item for the tax amount to be calculated in QuickBooks Online.
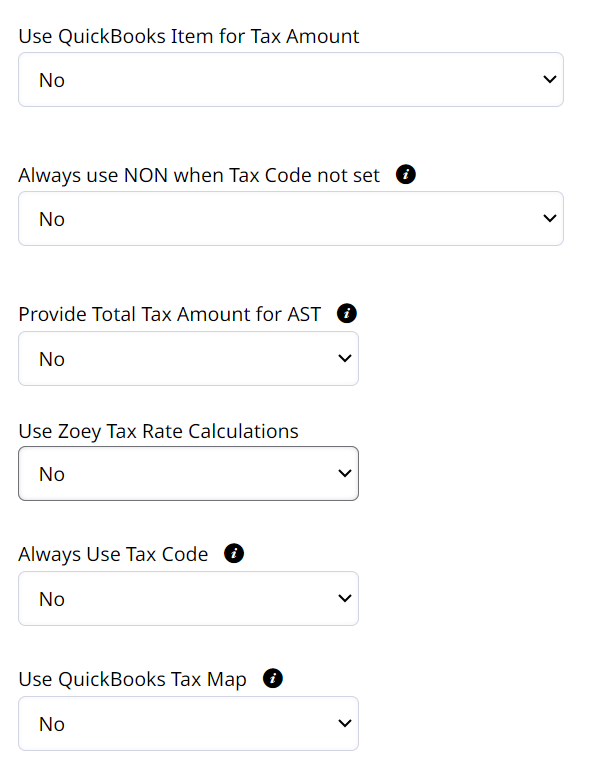
- Use QuickBooks Item for Tax Amount
When set to Yes, an additional field called QuickBooks Item Name for Tax Amount will appear for you to enter the Item's Name which you are mapping Tax Amount as. The item whose name you enter must exist in QuickBooks Online - Always use NON when Tax Code not set
When set to Yes, if the Tax Rate for the Item cannot be determined, NON will be used.
This means that if there is no Tax Rate for an item on the Zoey Order, the item will be sent as non-taxable. - Provide Total Tax Amount for AST
When set to Yes, Zoey will provide the total tax calculated for the QuickBooks payment. This will overwrite QuickBooks' AST calculations. When this is set to Yes shipping taxes will not be calculated separately on the QuickBooks payment but will be included in the Total Tax. - Use Zoey Tax Rate Calculations
When set to Yes, Zoey will send over the Tax dollar amount for the Invoice. If you have QuickBooks "AST" enabled, that can overwrite the tax amount Zoey sends. - Always Use Tax Code
Set this to Yes when your QuickBooks tax setup always requires a tax code. This is typically used for non-US tax integrations. - Use QuickBooks Tax Map
When set to Yes, allows individual Zoey Tax Rates to be mapped to QuickBooks Tax Rates and Codes
When set to No, if a tax rate is found on the Zoey order the QuickBooks Payment Item will be set to TAX
If you are NOT collecting Tax, you can leave all the settings to No.
Zoey tax rate calculations will only work properly if Automatic Sales Tax (AST) is disabled within QuickBooks.When AST is enabled, it may overwrite the tax amount provided by Zoey.
That's it! With these settings configured, you can begin testing the link between QuickBooks and Zoey.Click here to learn how to push Invoices and Orders manually. It is a helpful tool for testing and managing across systems.
Updated 3 months ago
