Account Address Data Mappers
Account Bill Tos and Ship Tos can be imported or exported through their respective mapper objects.This guide will cover Importing Addresses, click here to learn about Exports through Data Mappers.
These mappers have extra features such as choosing the lookup field for Accounts, Locations, and Addresses.For example, you can update a specific Ship To address through the External ID fields on an Account, the Location, and the Address itself.
If that Address or Location is not found, the mapper will create a new Location and Address with the External ID set on them for future updates.
This import behavior is perfect for syncing address updates to Zoey from an external system.
Setting up an Account Address Data Mapper
You must first determine whether you are importing a Bill To address, or a Ship To address.
Importing Shipping Addresses through Data Mappers
- Set up your Data Mapper's basic Configuration. Provide the Name, choose a Connection, and set up your Schedule. This can be done after setting up the mapper.
- Select Account Ship Tos in the Zoey Object drop-down.
- Change Type to File Import.
- Select the Custom Flat File CSV Import from the Mapper Template drop-down.
- Now we will choose the Lookup Fields, and which columns to match against those fields to find the right Ship To Address to update.
You can lookup the Account and Location through their Name, Internal ID (Zoey ID), and External ID.
Using External ID allows you to set a custom value in the External ID field which will be used to find the Address to update.
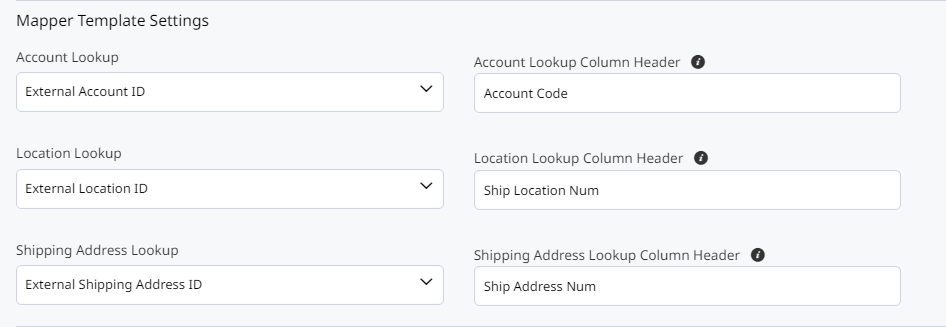
- Choose which field will be used to lookup the right Account. Then enter the Header on your CSV which will contain the values to match against the Account Lookup field.
- Choose which field will be used to lookup the Location on an Account. Then enter the Header on your CSV which will contain the values to match against the Location Lookup field.
- Choose which field will be used to lookup the Address at a Location. Then enter the Header on your CSV which will contain the values to match against the Shipping Address Lookup field.
- Enter the File Name which will be imported.
- Input the folder structure where the File can be found. For example:
/Zoey/is a top-level folder and must be entered as shown.
Ship To Field Mapping
Ship To addresses are linked to a Location: You'll need to provide the
location_namein your mapper if you want to create a Location with supplied details when not found via the External ID in Location Lookup.
Add Fields from CSV File will enable you to upload your CSV for the column headers to populate automatically.
There are a couple of values that make up a Shipping Address. You can find the values by searching through the Zoey Value drop-down. We have listed some of them below:
| Zoey Value |
|---|
| [Location] Location External Id |
| [Location] Location Name |
| [Account Address] External Id |
| [Account Address] Company |
| [Account Address] Street |
| [Account Address] City |
| [Account Address] Postcode |
| [Account Address] Region Id |
| [Account Address] Country Id |
| [Account Address] Telephone |
Custom Address Attributes can also be found and mapped to by searching through the Zoey Value drop-down.
Add Copy To
You must use + Add Copy To if you are using the same CSV data for two different Zoey Values.For example, if you're pulling
[Location] Location Nameand[Account Address] Companyfrom the same column data, you must click "+ Add Copy To" to choose additional Zoey Values where the data will be set.

Save and run your mapper to see Shipping Addresses get updated, new Ship To Locations created, and existing Shipping Addresses updated based on the fields and lookups configured.
Importing Billing Addresses through Data Mappers.
These steps are very similar to the Shipping Address Data Mapper Import, with one notable exception.
Bill To addresses don't have locations: The billing address will be updated if matched, or created if not matched by External ID.
- Set up your Data Mapper's basic Configuration. Provide the Name, choose a Connection, and set up your Schedule. This can be done after setting up the mapper.
- Select Account Bill Tos in the Zoey Object drop-down.
- Change Type to File Import.
- Select the Custom Flat File CSV Import from the Mapper Template drop-down.
- Now we will choose the Lookup Fields, and which columns to match against those fields to find the right Bill To Address to update.
- Choose which field will be used to lookup the right Account. Then enter the Header on your CSV which will contain the values to match against the Account Lookup field.
- Choose which field will be used to lookup the Billing Address on an Account. Then enter the Header on your CSV which will contain the values to match against the Billing Address Lookup field.
- Enter the File Name which will be imported.
- Input the folder structure where the File can be found. For example:
/Zoey/is a top-level folder and must be entered as shown.
Bill To Field Mapping
Add Fields from CSV File will enable you to upload your CSV for the column headers to populate automatically.
The values that make up Billing Addresses are the same as Shipping Addresses, minus the Location related values. You can find the values by searching through the Zoey Value drop-down. Or consult the list above.
Updated about 1 year ago