HTML Block
The HTML block allows you to add HTML or Code Snippets to a page. You can find the HTML Block in the +Add Menu > Building Blocks
Overview

Click or Drag & Drop to add the block to your page.
Using the HTML Block
After adding the block to your page, click the "Edit My HTML Component" button to Add or Edit HTML Code.

Within the Edit Screen, you can add or edit HTML Code.

There are two settings for the HTML Block:
- Render HTML in the Editor
This will allow the HTML to render inside of the Visual Design Editor. We recommend turning this off if the code added does not have a visual representation, or if the code will render something very large. - Execute JavaScript in the Editor
This setting enables / disables JavaScript to run in the editor. We recommend keeping this setting off unless necessary so that it does not interfere with the drag & drop interface. .
Global HTML Variables
| Variable | Desrcription | Formatting |
|---|---|---|
[customerId] | The ID of the customer if logged in. | Int |
[customerGroupId] | The ID of the customer group. | Int |
[customerEmail] | The email address of the customer if logged in. | String |
[customerFirstName] | The first name of the customer if logged in. | String |
[customerLastName] | The last name of the customer if logged in. | String |
[cartId] | The ID of the current cart if there are items or if the customer is logged in. | Int |
[account.id] | The ID of the Account logged into. | Int |
[account.name] | The name of the Account logged into. | String |
[account.company_location_id] | The relative ID of the Location at the Account (used internally for Orders). | Int |
[account.location_id] | The ID of the Account Location. | Int |
[account.location_name] | The name of the Account Location. | String |
[customer_group_login_redirect_url] | The customer group specific login redirect URL. | String |
Here's an example of how these variables can be displayed in an HTML block.
<ul>
    <li>Current Account ID: [account.id]</li>
    <li>Current Account Name: [account.name]</li>
    <li>Current Account Location ID: [account.location_id]</li>
    <li>Current Account Location Name: [account.location_name]</li>
    <li>Current Customer ID: [customerId]</li>
    <li>Current Customer Email: [customerEmail]</li>
    <li>Current Customer Last Name: [customerLastName]</li>
</ul>
Global variables will work in:
- Html Block Components
- My Account QuickLinks Component
- My Account Content Link Tiles
Example usage of the Customer Group Login Redirect URL to add a "Continue Shopping" button:
<br>
<center>
    <a href="{{if customer_group_login_redirect_url}}{{var customer_group_login_redirect_url}}{{else}}/{{/if}}">
        <font style="font-size:18px;"><b style="color: rgb(192, 80, 77);">Click here to continue shopping</b></font>
    </a>
</center>
The custom HTML button above will take customers back to their Customer Group Landing Page.
Customer Attribute Variables

Any customer attribute that has been created can be used as an HTML variable using the format [customer.drop_down]. ( drop_down is the attribute "Code" as illustrated in the image above. )
Customer Address Variables
Any customer address attribute that has been created can be used as an HTML variable using the format [customer.defaultBillingAddress.drop_down] or [customer.defaultShippingAddress.drop_down]. ( drop_down is the attribute "Code" as illustrated in the image above. )
Account Address Variables
Any account address attribute that has been created can be used as an HTML variable using the format [account.defaultBillingAddress.drop_down] or [account.defaultShippingAddress.drop_down]. ( drop_down is the attribute "Code" as illustrated in the image above. )
Account Variables
Account attributes can be displayed, or used in scripts, through an HTML variable in the storefront.
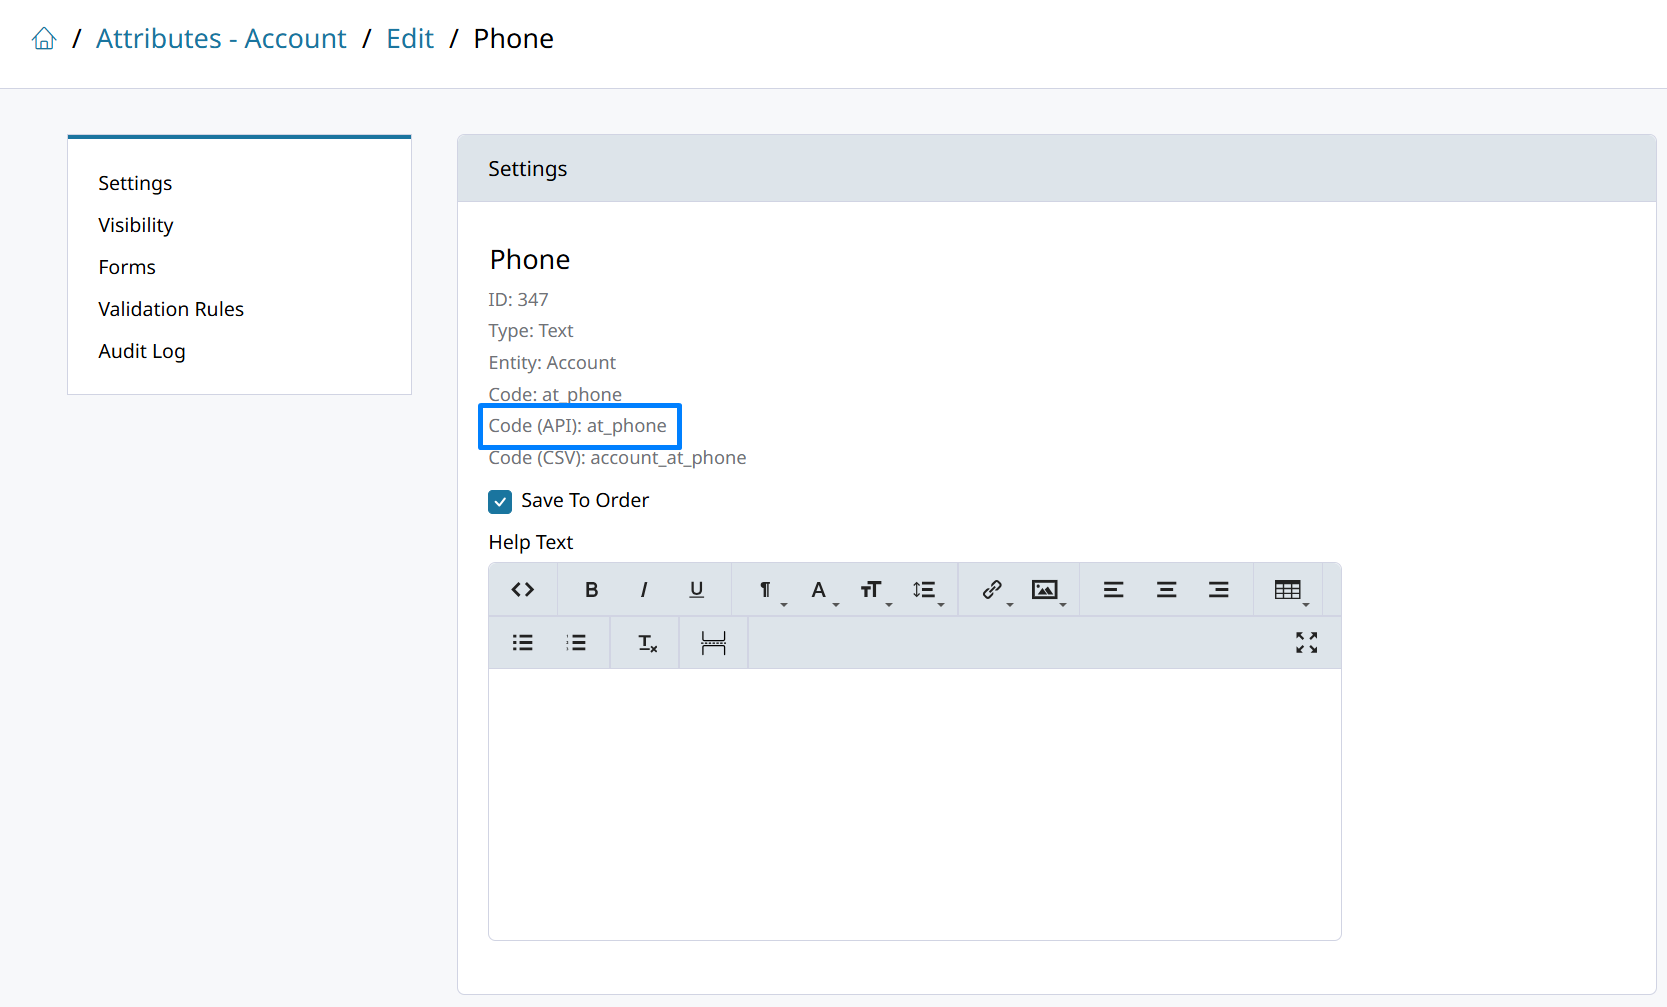
Utilize an HTML variable by taking the attribute's API Code and formatting it as shown below.
[account.{Attribute API Code}]
For example: [account.at_phone] would contain the value for the Phone attribute shown below.
Updated 6 months ago