Avalara AvaTax for Zoey
You must have an Avalara Avatax account to use this appThere is no charge to install the Avalara app, but you will still need an Avalara account to be able to enable tax calculations through Avalara Avatax.
| Avalara Support Resources |
|---|
| Tax Code Search - Avalara |
Configuration/User Guide
Avalara AvaTax is a cloud-based solution automating transaction tax calculations and the tax filing process. Avalara provides real-time tax calculation using tax content from more than 12,000 US taxing jurisdictions and over 200 countries, insuring your transaction tax is calculated based on the most current tax rules.
1. Install the Avatax App to Your Zoey Store
First, log in to your Zoey store.
Then, Click Here to install the Zoey Avalara App
You will see a screen pop up asking you to confirm installation.
Once confirmed, the Avalara Avatax app will be available in your Zoey store.
2. Connect to AvaTax
Your Shipping Origin must be configured in Orders > Settings before connecting to AvaTax.
Once inside the Zoey admin, click on Apps on the left menu.
Then select Manage next to the AvaTax option of the Avalara app section on the Apps page:

At the top of the configuration settings you'll need to enter your Avalara AvaTax Credentials:
- Action: Set to "Enable: Calculate Tax, Submit Data and Commit"
- You can use AvaTax to calculate tax without committing it to the Avalara tax record. Set your Action accordingly.
- URL: Set to "Production"
- Account Number: Provided during your AvaTax account activation process.
- Key: Provided during your AvaTax account activation process
Click "Get Companies" to then load the company you created in AvaTax. Then:
- Company Code: Select the company set up during your AvaTax account activation process.

Clicking "Get Companies" will also test your connection; if you get an error, please check the values provided.
3. Configure Avalara AvaTax
Below this section of the app administration screen are additional settings available to configure AvaTax. Not all are required to get started.
- Taxable Country: Which countries you need to collect tax.
- Filter Requests by Region: If you wish to only send requests for a certain region, you can adjust here. We recommend leaving this to "None" by default so all orders flow to AvaTax.
- Detail level: Defaults to "Line," which is the recommended setting.
Log & Queue Settings
All of the settings in place are recommended defaults and are not needed to be updated unless you want to keep logs for a longer period of time, or wish to adjust what is collected.
Data Mapping
Again, default information is populated based on your Zoey store. No changes are necessary unless you need to make adjustments specific to your store.
Shipping Address Options
You can adjust the error messages and error handling rules for shipping validation issues here. Defaults are provided, but can be edited to match the requirements for your store.
Request Settings
No changes are required here unless you wish to set required fields for requests. Note that if customers do not fill in what is set here as required, they may encounter errors/delays in checking out that could reduce conversions, so adjust with caution.
Error Handling
Similar to the Shipping Address Options section above, you have error handling and message settings you can adjust based on your preference, but standard defaults are provided.
Limit tax calculation requests
These are set to disabled by default, and Zoey is designed to work with AvaTax to make calculations at the right time. No changes are recommended unless advised by Avalara.
AvaTax Customs Duty Calculator
By default most stores will not need to configure this. Default settings are available for Shipping Insurance as needed.
4. Assign an Avalara tax exempt category to a customer
Tax exemptions for customers are assigned via the Customer Groups feature.
First, you will need to create a customer tax class.
- Go to Setup -> Tax.
- Select Manage on the Customer Tax Classes section
- Click the Add New button in the upper right corner.

Customer Tax Class - AvaTax Codes
These are Customer tax class codes. For Product tax codes click here.
Setting an AvaTax Code overrides exemptions for the customer configured in AvaTax.Setting an AvaTax Code in your Customer Tax Class in Zoey will override any special tax code or exemptions applied to the customer in AvaTax.
-
Name the new Tax Class. Then, in the AvaTax code, enter the appropriate tax code from the following list:
-
A - Federal government (United States)
-
B - State government (United States)
-
C - Tribe / Status Indian / Indian Band (both)
-
D - Foreign diplomat (both)
-
E - Charitable or benevolent org (both)
-
F - Religious or educational org (both)
-
G - Resale (both)
-
H - Commercial agricultural production (both)
-
I - Industrial production / manufacturer (both)
-
J - Direct pay permit (United States)
-
K - Direct mail (United States)
-
L - Other (both)
-
M - Not Used
-
N - Local government (United States)
-
O - Not Used
-
P - Commercial aquaculture (Canada)
-
Q - Commercial Fishery (Canada)
-
R - Non-resident (Canada)
Click Save Class.
Then, you need to assign a customer group to use that class.
- Go to Customers -> Groups.
- Click Add New Customer Group to create a new customer group to use the tax class, or click on a customer group to assign an existing customer group to the class.
- In either instance, make sure the group is named and has the same tax class selected as created in the previous steps.

- Click Save Customer Group.
Finally, to assign customers to this group:
- Go to Customers ->Customer List.
- Click on the customer you wish to assign.
- In the Account Information section, assign the Group you created previously.
- Click Save Customer.

5. Assign an AvaTax System Tax Code to an item
To assign a special AvaTax Code to a product you must configure its Product Tax Class. (Settings > Tax > Product Tax Classes)
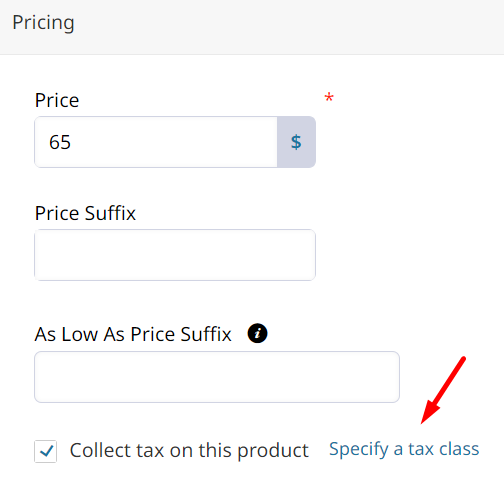
If "Collect tax on this product" is not checked off, the
NT(non-taxable) code will be sent to Avalara.
When AvaTax is enabled, any taxable product will have its tax amount calculated automatically. If you have special products which require a different tax rate, you must add a new Product Tax Class and set it on that Product.
| Avalara Tax Code Documentation |
|---|
| Tax Code Search - Avalara |
How to add the AvaTax Code which represents the product or service tax rate to your Product Tax Class.
- Go to Setup -> Tax.
- Click Manage on the Product Tax Classes section.
- Click Add New on the upper right corner.
- Name the tax class. Enter the applicable tax code in the AvaTax Code box.
- Click Save Class.

Example above. Enter the code provided by AvaTax to ensure best results.
Then you will assign the tax class to a product.
- Go to Products -> Products List.
- Select the product you wish to edit.
- In the Pricing section of the Product, click the Specify a Tax Class link.

- Select the tax class created earlier in this process. Then Save the product.
AvaTax App Settings
Connection Settings
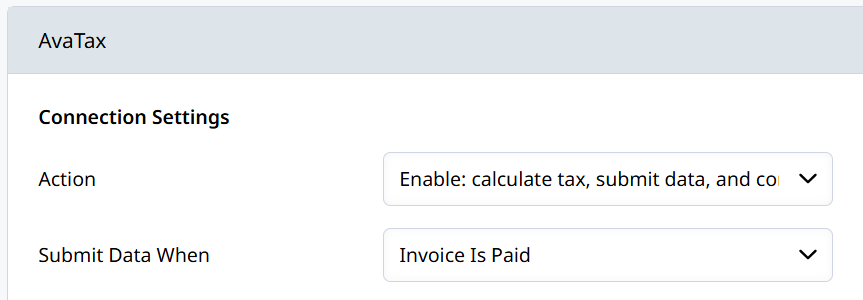
Action
Set which actions will be performed by the integration:
- Enable: calculate tax
- Enable: calculate tax, submit data
- Enable: calculate tax, submit data, and commit
Submit Data When
This setting controls at which point the tax transaction is recorded in Avalara. Choose whether to record tax collection when the Invoice Is Paid, or when the Invoice is Created.
Updated 3 months ago